

Ecosytems Curriculum
Section 3: Lesson Plan — Comparing Worm and Worm-free Compost Tanks
Materials
- Two identical tanks (High and narrow will give the best results.)
- Soil (There should be enough for 2-3 inches in the bottom of each tank. Be sure to NOT use sterilized potting soil.)
- Composted leaves and/or other organic matter (There should be enough for 2-3 inches in the bottom of each tank.)
- Slightly shredded or composted leaves (There should be enough for 3-4 inches in the bottom of each tank.)
- 12-15 worms (for a tank approximately 12" x 14" x 4." Adjust up or down depending upon tank size.)
- Observation journals
- Measuring Cup
Prep Step
- Review understanding goals and background information.
- Read the lesson plan.
- Purchase worms or dig some up in the garden.
- Gather tanks, soil, compost mixture, and leaves for compost tanks.
- Prepare observation journals for each student by either stapling together several sheets of paper or by using small composition books.
- Prepare observation journals for each student by either stapling together several sheets of paper or by using small composition books.
- Photocopy observation sheets.
Analyze Thinking
Step 1: Gather Students' Ideas and Questions
Explain that the activities in this lesson will help us find out more about how decay happens. Review students' ideas about decay. Some common ideas that students hold include: Decay is when something just breaks up and disappears; Physical factors such as animals, wind and rain spread it out into the dirt and make it decay; There are creatures that break it down and make it decay. Explain that more than one of these things could be responsible for decay.
Ask, "Now that we have learned more about decay, would anyone like to change their ideas?" Gather ideas.
Worms in the Classroom
Acquiring Worms
Worms can be acquired by digging them up in the garden, buying them at a bait store, or ordering them from an educational supplier. If you plan to dig them up, look in a rich soil area such as a garden, under rocks or logs, or on the lawn after a heavy rain. Going out at night with a flashlight after a heavy rain is also a good way to find them. Buying them at a bait shop is fairly straightforward. Most large biology and educational supply companies sell worm 'packages.' Here are a few places to try:
- Carolina Biological: http://www.carolina.com, 1-800-334-5551
- Nasco: http://www.enasco.com, 1-800-558-9595
- Insect Lore: http://www.insectlore.com/, 1-800-LIVEBUG
- Aquatic Eco-Systems, Inc.: http://www.aquaticeco.com/, 1-407-886-3939
Caring for Worms
To care for your worms, keep them in a large tank or bucket filled with rich soil. Adding things like sawdust, compost, dead leaves, manure, or peat will improve the quality of your soil. Water the tank enough to keep it damp, but not wet. Keep it in the coolest part of the classroom; worms are happiest between 10 and 15° C (50 and 60° F). Typically the worms need to be fed occasionally with small amounts of organic matter such as grass clippings, fruit peels, or dried leaves. (However, in the worm tank experiment, include the organic matter from the outset so that you won't have to add to the matter during the experiment.) Planting grass seeds in the soil is a good way to keep an eye on moisture in the tank: the amount of water needed to keep the grass healthy will also keep the worms happy.2
RECAST Thinking
Step 2: Make Predictions as a Group Comparing Worm and Worm-free Compost Tanks
Explain that a worm compost tank is a tank filled with compost and worms. Ask: "What do you think happens to the organic matter in a worm compost tank?" Record students' predictions.
Have students take a few moments to think about what would happen without these decomposers. Then ask: "What do you think would happen if there were no worms to eat the dead plants and things (in a worm-free tank)?" Track students' predictions on the board or on chart paper. Ask students to justify their predictions with reasons.
If students did the decomposition chamber in the last section, ask them to consider what happened in considering what might happen here. How is the decomposition chamber similar to and different from the worm and worm-free tanks?
Step 3: Explain the Activity
Explain to your students that in order to know if their predictions are correct, they can gather some evidence by creating a test. Ask: "What might you do to test out your predictions about what would happen if there were no decomposers?" Collect ideas.
Step 4: Set up the Tanks
- Show students two identical tanks.
- Measure out the same amount of soil for each tank.
- Spread it in the bottom of each tank.
- Do the same with the compost mixture, and then with the shredded leaves. (As you add each layer, try not to disturb the layer below it, so it replicates the layers that might be found on the forest floor.)
- Make sure that there are no worms in the compost and make sure the students agree with you.
- Sprinkle each tank with the same amount of water.
- To one of the tanks, add 12-15 worms. Label it "Worm Tank."
- Label the other tank "Worm-free Tank."
- Leave the top of the tanks open. A piece of screen could be stretched across each tank.
Step 5: Discuss the Design of the Comparison
Ask, "Why should there be both a worm-free compost tank and a worm compost tank?" Discuss the importance of being able to compare what happens in the two tanks.
Ask, "What kinds of things should be equal between the two tanks in our test?" Students saw you put the same amount of soil, compost, and leaves in both tanks. Some may realize that other things such as light, water, heat, etc. will matter. Make sure students realize that by making everything the same (controlling for the other variables) except the worms, you can see the effect of the worms.
Ask, "What would you look for as evidence to support or contradict your predictions?" Generate a list of things to look for. (For instance, measuring the height of the stuff in the tank, noting what it looks like, etc.) Over the next few weeks, continue to revise the list as students realize new types of evidence.
Step 6: Make Predictions as Individuals Comparing Worm and Worm-free Compost Tanks
- What will happen to the leaves and soil in the worm compost tank versus those in the worm-free compost tank?
- Why do you think this will happen? (Give reasons for your predictions, including information you already know about decay.)
- What evidence will you look for to tell you what is happening?
- What other questions do you have? (List things that you want to find out more about.)
Step 7: Arrange for Care of the Tanks
Create a schedule for observing the compost tanks and for periodically watering them. (Each tank should receive exactly the same amount of water. Don't over-water as it will drown the worms.) Keep the tanks out of direct sunlight. Put them in the coolest, darkest location in the classroom.
Assign students to make observations every few days, including the kinds of observations they have identified as providing evidence for their predictions. (These might include measuring how high the pile is in addition to visible changes and smells.)
Ask students to independently observe the compost tanks and to record their observations in their journals using the guidelines generated in class and any others they added in their journal for what makes good evidence.
Note to Teacher: In approximately 6-8 weeks, have a follow-up lesson where students discuss what they saw and learned from the activity.
Step 8: Revisit the Worm Tanks
Come back to this lesson after approximately six weeks have passed. (The Time-Lapse Photos of Worm and Worm-Free Tanks illustrate the types of changes that you can expect in the worm and worm-free tanks over time).
Discuss the observations and measurements that students made over time. Invite students to share. Compare their observations and measurements of the two tanks. Typically students notice that the worm tank appears to have increased in volume and then to have decreased. The worm-free tank typically decreases slowly. The initial increase in the worm tank is due to the burrows that the worms build, which push the organic matter aside.
Ask, "How can you explain the differences? What do you think is going on?" Gather ideas.
Students' Predictions for the Worm and Worm-free Tanks
What do you predict will happen in the Worm and Worm-free Tanks?
- After a few days the leaves in the worm tank will disappear. Worms will eat them.
- The worm tank will weigh less.
- The leaves in the worm tank will get smaller and some will turn to soil
- Nothing will happen in the worm-free tank.
- The leaves will go down in the worm tank and the leaves will stay the same in the worm-free tank.
- Stuff will fall apart in both tanks.
- The worms will eat all the leaves and need more food.
Step 9: Consider the Results in Each Tank
First, consider the worm tank. Ask: "Why does it look like there is less in the tank than there was?" Help students to realize that the worms are digesting and decreasing the space that the compost takes up because they are making the pieces smaller.
Ask, "Is the stuff in the tank actually disappearing?" Gather ideas. Explain that the matter is not actually disappearing, but it takes up less space because the tiny particles fit more closely together than big particles. (There are a couple of ways to show this idea. See If nothing has disappeared, how come it looks like there is less stuff in the tanks?, below.) It also looks like less because gases are a product of decomposition. So some of what the decomposers eat goes into the air. This isn't the same as disappearing. You just can't see it.
If nothing has disappeared, how come it looks like there is less stuff in the tanks?
It can be hard for students to reconcile the idea that matter is NOT disappearing when it looks like there is less in the tanks than there was before. How can this be so? It has to do with the size of the particles and how they are arranged. There are a couple of ways to show this to students. You could show this idea by taking balls or marbles of different sizes (but the same material) and showing how if you weigh out equal amounts of bigger and smaller marbles, so that you have the same amount of stuff, the smaller marbles pack into a smaller amount of space.) Another possibility is to demonstrate the difference by chopping something up finely, as with the apples in the picture.
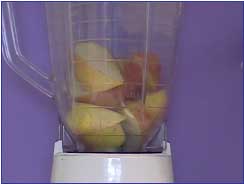
Ask students, "How come there appears to be less apple in the blender once it has been chopped up?" What is happening is that the particles have less space between them, so they are closer together and look like there is less apple. Show your students the first image of the apple slices. Ask if they think that the apple is taking up as little space as possible. Could the pieces be re-arranged so that they are closer together? Ask them to point out any place where the apple pieces are not touching and where they think there is space between the slices.
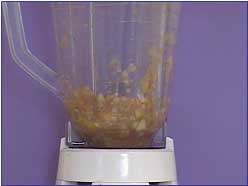
Next, show them the second image of the chopped up apple. Ask them if they think this apple takes up the same, more, or less space. Ask them to explain why it would or would not take up less space. Explain that it is the same apple. Ask them to imagine that the apple slices are particles in the worm tanks from the day the tanks were put together. Imagine that each slice is a dirt molecule. There is room between these particles. Over time, as the worms move around and the gases escape, the particles get closer and closer together and the height of the material in the tank goes down and it appears that there is a lot less of the matter than there was on the first day. It's like the apple: in the first image there is a lot of space in between the slices. Once the apples were chopped up into smaller pieces, the particles fit closer together, so it appears that there is less apple even though the amount hasn't changed.
Next consider the worm-free tank. Gather ideas. Some students will think that the compost just falls apart on its own, others may think that there are worms that we didn't catch, others might mention little tiny bugs or microbes. Explain that there are tiny organisms called microbes that are breaking down the dead matter. They are so small that you cannot see individual organisms, but when they grow as a group, you can see them. They do MOST of the decomposing—not worms and other decomposers that you can see.
Ask, "How many of you have ever seen mold or fungi growing on food?" Explain that these are microbes. They digest the thing that they grow on and as they do, they break it down into little particles that green plants and other organisms need to grow.
Note to Teacher: Some students will not be easily convinced that things don't just fall apart on their own. You could address this though the bread mold activities, Collecting Evidence for Non-Obvious Decomposers: Growing Microbes on Bread and Learning About Preservatives: Bakery Bread Versus Store Bought Bread.
Explore Causality
Step 10: Contrast Obvious and Non-Obvious Causes
Ask, "Why do you think it was hard to know that the microbes were making the leaves and compost decompose?" Gather ideas. Explain to students that when they are looking for the cause of something, it is a natural tendency to look for an explanation that they can see (or hear, smell, etc.). If they can't find an obvious cause, then they might look for something that is not so obvious. In the case of decomposition, they can see worms and sow bugs, etc., so they may assume that these creatures are making decomposition happen. They might not think to check if something else is ALSO responsible for decomposition. Matter recycling is a BIG job and there would have to be a lot of worms, etc. to do all that decomposing. It turns out that there are millions of microbes at work and that they do MOST of the decomposing.
Review, Extend, Apply
Step 11: Review the Understanding Goals
Discuss the Understanding Goals with students to be sure that they understand them.
Step 12: Apply the Concepts More Broadly
Say, "Consider how we preserve foods. What makes it possible to 'preserve' them? If things did just fall apart on their own, how is it possible that heating or sterilizing make them last longer? What does sterilization actually do?" (It destroys the microbes responsible for decay.) Discuss students' ideas.
Ask, "What about pressure-treated lumber that contains chemicals to make it last longer? What is going on there?" (The chemicals kill the microbes that would digest the wood and break it down to recycle it.)
